Saturday, January 29, 2011

Kuih Makmur @ Momo

My Hubby came home one day with a half-empty cookie container and raved about what contained inside. Handing over the cotainer to me, he said, "You gotta try these peanut cookies, they're mmmm ... so melt-in-the-mouth, they're really good..... sorry, these are what left".
I took a closer look . Peanut cookies NOT! They're KUIH MAKMUR! 


Kuih Makmur also known as Kuih Momo over here in East Malaysia, actually don't contain peanuts. The flour is pre-roasted  to impart a nutty aroma & flavour and one can mistaken as ground peanuts. These delightful icing sugar coated round buttery balls crumble and dissolve into a fragrant nutty paste once popped into the mouth. I've never actually come across anyone who doesn't like these morsels which are usually found during the festive season.

East Malaysian Kuih Makmur/Momo are by no means the same as the ones in West Malaysia. Those in West Malaysia are usually shaped like leaves, not round and has ground peanuts as filling and is coated with caster sugar on the outside.

Here's a keeper recipe for Kuih Makmur/Momo taken from "Sunflower Food Galore".


Kuih Makmur/Momo

Ingredients:
250g plain flour or all purpose flour
40g icing sugar 
75g full cream milk powder
150g ghee (I used QBB brand)
1/4 tsp salt
1 egg yolk
about 1/2 cup sifted icing sugar for coating
Method:
1) In a frying pan, dry fry plain flour at medium low heat for about 5 - 6 minutes. Keep stirring the flour to avoid burning till flour becomes very hot, smells lightly nutty and has turned a very light brown tinge. Remove from heat and leave to cool.
2) Using pestle and mortar, grind salt with 1 teaspoon of the dry roasted flour to a fine powder. Add this to flour.
3) Mix all the dry ingredients together, then sieve. Remove remaining gritty grains.
4) Melt ghee in microwave for about 20 - 30 sec. Beat in the egg yolk.
5) Pour ghee and yolk mixture into the dry mixture. Mix with a folk or spoon then finish by rubbing with fingers till dough is evenly mixed. The dough is crumbly but should form a lump when squeezed together.
6) Take a pinch of dough, squeeze to form a lump then lightly roll between palms into a ball about 2cm wide. Do this without exerting  pressure or it will crumble.
7) Place balls on baking tray lined with baking paper, leaving some space in between balls.
8) Bake in a preheated oven at  150 deg Centigrade for about 12 - 15 minutes till light golden. Momo balls will expand slightly after baking.
9) When the Momo balls are cool enough to the touch, coat generously with icing sugar. Do this gently as they are very fragile. Leave to cool completely.

Thursday, January 20, 2011

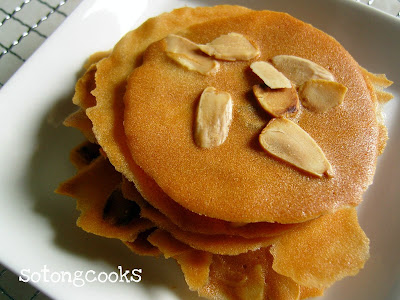
Almond Tuiles


If you have lots of leftover egg whites and don't know what to do with them, do try this super thin and crisp almond tuiles to impress your family and friends (and yourself!). The recipe for the batter is a breeze to whip up with minimal ingredients, but I forewarn u first, this is a very time consuming recipe to bake!

To make these tuiles, you need to spread a thin layer of  round circles about 2 inches wide on a baking paper lined tray, and then sprinkle some flaked almonds on top before sending to bake. Each process makes only a few pieces at a time and need to be repeated until you've finished your batter. 


After about  a couple times of spreading -baking-cooling, I got tired & bored. I mixed the flaked almond with the batter and then spreaded the batter into a big rectangle instead. Once cooled, the big rectangular piece was broken into smaller random pieces (you can see from the photos the irregular shaped ones at the bottom). Of course, the round ones definitely look a ton better but if you don't mind and you're not a perfectionist, do try the short cut way.


ALMOND TUILES  
(Recipe taken from 'No Frills Recipes' here )

Ingredients
2 egg whites lightly beaten
60 gm caster sugar
2 Tbsp or 30 gm butter  (melted)
50 gm plain flour
1/4  tsp vanilla
Almond flakes/Pumpkin seeds (amount as desired)

Method
  1. Sift flour into a mixing bowl, add in sugar, mix well.
  2. Make a well in the centre, add in the melted butter, lightly beaten egg whites and vanilla.  Mix till well combined.
  3. Let batter rest for 30 mins.
  4. Drop 1 leavel teaspoon of batter onto a baking tray, lined with baking paper.
  5. Using the back of the spoon, slowly spread the mixture as thinly as possible to a circle about  2 inches in diameter.
  6. Sprinkle some almond flakes onto the centre of the batter.
  7. Bake in a preheated oven at 180 deg C for about 3 mins, or till lightly brown.  
  8. Let stand for a minute and carefully lift the biscuits from tray to cool on a wire rack.
  9. When completely cooled, store in an air-tight container or jar.
  10. Makes 34 pieces. 

Note:
  • I baked my almond tuiles at 160 deg C for about 20 minutes. At 180 deg C, my almond tuilles were not browned evenly. They were almost burnt at the edges and the middle still pale, undercooked and chewy. Please do a small test batch to find which temperature is suitable to you.
  • I used baking paper and didn't need to grease. The tuilles were easily removed while they're still warm. I used a pallete knife by sliding it underneath the tuilles, then lifting up from the baking paper.
  • I've lightly pre-roasted the flaked almonds  first for better aroma. I did this by dry-frying on a pan on the stove. Becareful not to burn! 


Super thin & crisp!

I'm submitting this post to Aspiring Bakers #3: My Favorite CNY Cookie (Jan 2011). Details can be found here.

Tuesday, January 18, 2011

Chocolate Gelato


I wanted to try an eggless ice ceam recipe see how it compares with the  custard base one in terms of creaminess & smoothness. This eggless recipe using constarch made very creamy ice cream indeed but it had a slight 'chalky' mouthfeel. I don't know why, probably due to the use of  cocoa powder or it could be due to undercooking the cornstarch. This ice cream was also a little icy and rock hard after freezing and had to be left out a while before serving, but hey, I made this without an ice cream maker!  Misgivings aside, this ice cream turned out extremely chocolaty, good for die hard chocoholics! My daughter remarked, "It's like eating frozen chocolate icing!" I think so too and one spoonful was enough to satisfy my chocolate cravings for the entire day.


CHOCOLATE GELATO RECIPE
(Recipe adapted from 'Cafe Fernando' here)

Ingredients:
1 cup whole milk
2 cups heavy cream
1 cup cocoa powder
1 cup sugar (Reduced to 1/2 cup + 1 tablespoon, I don't like my ice cream too sweet)
2 tbsp cornstarch
Pinch of salt

Method:
  1. Bring 2 cups of heavy cream to a simmer in a medium saucepan over medium heat, then remove from heat.
  2. In another bowl, combine milk, sugar, cornstarch, salt and cocoa powder, then  add to hot cream. Return to stove and cook on low to medium heat until sugar and cocoa dissolve (5-10 minutes).
  3. Set aside to let cool, then cover and refrigerate overnight.
  4. Process mixture in an ice cream maker according to manufacturer’s directions.
Note: I don't own an ice cream maker, hence I had to process the ice cream by hand. After Step 3 above, I poured the ice cream mixture into a container and kept it in the freezer until half frozen. Then, took the ice cream out and gave it a vigorous mix to beak up the ice crystals. Put the container back into the freezer again and repeated the process of 'freezing -mixing-freezing' about 3 times.


Sunday, January 16, 2011

Mix Veg Stir Fry


I had eaten a very delicious simple vegetable dish in a restaurant which I tried to recreate at home and the resulting dish is this, I call it 'Mix Veg Stir Fry'. Though it didn't turn out exactly like the restaurant dish, I'm very pleased with the end result and have cooked this many times to date, and this gets thumbs up everytime from my Hubby!  Sweet, crunchy and soft at the same time, this vegetable dish has claimed a permanent spot on the weekly menu for me & my family. When there are leftovers, which is quite rare, I incorporate them into an omelete dish which is equally delicious.


Mix Veg Stir Fry
Timun Jepun

Ingredients:
1 Timun Jepun (a type of dense cucumber)
1 Carrot
200g Wood Ear Mushrooms
2  Leeks
about 100g diced Luncheon Meat / Spam
1 Tbs Oyster Sauce
1 Tbs chopped Garlic
Salt to taste

Note: Luncheon Meat can be substituted with any meat of your choice. I've cooked this with diced marinated chicken and they were good.
How to cook:
1) Slice Timun Jepun, Carrot, Wood Ear Mushrooms & Leeks into thin even strips.
2) Heat up a tablespooon of oil in a pan, saute garlic and luncheon meat till fragrant (if you're using raw marinated meat, cook till meat is fully cooked). Add in the timun jepun and carrot and stir fry a while before adding in  the wood ear mushrooms and leeks. Add oyster sauce and season with salt. Add a little water if it gets a little dry. Stir till cooked or until vegetables are soft to your liking. Done!


Mix Veg Omelette

Ingredients:
leftover Veg Stir Fry
2 Eggs
2 tsp Soy Sauce
a few drops Sesame Oil
a dash of white Pepper

Method:
1) Beat eggs together with soy sauce, sesame oil and a dash of white pepper.
2) Combine the the egg mixture with leftover Mix Veg Stir Fry and cook in a pan heated with 1 Tbs cooking oil. Fry both sides till cooked. Serve.

Thursday, January 13, 2011

Green Tea Jelly


Tea lovers are not left out too! Here's a simple Green Tea Jelly recipe for a refreshing and antioxidant loaded treat. 

Green Tea Jelly
(Recipe adapted from here.)

Ingredient:
1 Tbsp Green Tea powder (Matcha)
1 1/2  Tbsp Sugar
500 ml Water
10 gram Gelatin powder (about 1 heaped tablespoon)
Whipped cream for topping (I used pouring cream)

Note: 1 1/2  Tbs sugar was definitely not sweet enough for me eventhough I don't like very sweet stuff. I suggest increasing the sugar to 4 Tbs (or to your taste) or use sweetened cream for the topping. The next time I'm making this again, I will add some lemon juice to give it a fresh lemony tang flavor.


Preparation:
1. Put green tea powder, sugar and 10ml of hot water in a cup and mix well with a spoon.
2. Put gelatin powder in a bowl and add 100ml of water and mix well.
3. Boil 400ml of water. Then mix well with the gelatin mixture. Add in the green tea mixture, combine.
6. Pour into serving cups and let cool for a while.
7. Chill in the refrigerator until well set.
8. Top the set jelly with some whipped cream and sprinkle on green tea before serving.

Wednesday, January 12, 2011

Japanese Coffee Jelly


Simple easy dessert for coffee lovers.


Japanese Coffee Jelly Recipe
(from 'Hunger Hunger (A Daily Obsession)' here)
(makes 4 to 5 glasses)

Ingredients:

500 ml water
10 g gelatine powder (about 1 heaped tablespoon)
5 tablespoon caster sugar
2 tablespoon instant coffee powder


Method:

1. In a saucepan, boil the water.

2. In a small bowl, mix the gelatine powder with 5 to 6 tablespoons of the boiling water until gelatine is dissolved. Set aside the gelatine mixture.

3. Remove the saucepan from  heat, add in the coffee powder and sugar, stirring well until sugar is dissolved. Then add in the gelatine mixture, stir well.

4.Pour into molds or glasses, leave to cool in room temperature, then chill until set in the fridge.

5. Serve the set jelly  with whipped or pouring cream.


Monday, January 10, 2011

Chicken Sheperd's Pie


Yummy homey comfort food!

Chicken Sheperd's Pie for dinner, anyone?  Most recipes I've seen call for tinned condensed soup for the sauce, leftover chicken for the filling and leftover mashed potatoes for the topping. This recipe here however is my very own self concocted version from scratch. It's easy to make and is very versatile, you can change the recipe around to suit  your family. Chuck in whatever and however much meat or vegetable or herb or spice or cheese you fancy. Play around with it, I'm sure the end result will still be yummy.  Do try and have fun making your very own pie. 


Chicken Sheperd's Pie

Ingredients:

3 to 4 large Potatoes
1  Tbs Butter
1 to 2 Tbs Milk or Cream
Salt & Freshly Ground Black Pepper, to taste

600 g Chicken Thighs, deboned, skin removed & cubed
1 Tbs Oyster Sauce
1 Tbs Soy Sauce
Ginger Juice
1 Tbs Garlic
1 Tbs cooking wine
pinch of Salt &  ground white pepper
1 tsp Dried Tarragon

2- 4 Leeks
1 Carrot (diced, steamed)
1 Cup Broccoli (steamed)
1 Tbs Garlic
1 Tbs butter
1 Tbs plain flour
1 1/2 - 2 cups Chicken Stock
2 Tbs to1/4 cup Whipping Cream (half & half or single cream)
Salt & Freshly ground Black Pepper, to taste


How to cook:

Mashed Potatoes: Peel skin off potatoes, wash then steam for 15 minutes or till cooked & soft. Transfer to a bowl, mash up adding butter (add more if u don't mind your waistline!) and milk or cream (add enough to your desired consistency). Season with salt & pepper.

Chicken: Marinade chicken thighs with oyster sauce, soy sauce, ginger juice, garlic, salt & pepper for at least 2 hours or overnight. Drizzle some olive oil in a pan, pan fry the chicken. When the chicken is half cooked, add the tarragon and continue cooking  till golden fully cooked. Set aside.

Filling & Sauce & Assembly: When the chicken has been removed from the pan, add a little more olive oil and saute the garlic and leeks. Push to one side of the pan, add butter. When the butter has melted, add the flour and cook a couple minutes, stirring. Add chicken stock (add more if you prefer more sauce) and stir until smooth. Stir in cream (add more if you prefer a creamier & richer sauce). Season with salt & pepper.  Tumble in the carrot and broccoli. Simmer until veggies are soft and sauce has thicken, add the cooked chicken thighs, mix well. Remove from stove and pour into baking dish. Top with mashed potatoes. Bake at 180 degrees Celcius for about 20 minutes or until mashed potatoes are golden. Done!


Dig in!


Saturday, January 8, 2011

Almond Crunch Cookies


I have been eyeing this Almond Crunch Cookies recipe from one of my many favorite cookbooks, 'Baking Code' of the Alex Goh Baking Class series, but never got around to trying it. Well, honestly, cookies are not my forte .... too much repetitive work to handle for a lazy cook like me!


Baking time.
 Anyway, this month's Apiring Bakers Challenge hosted by Jess of 'j3ss kitch3n' is themed "My Favorite Chinese New Year Cookies". Good reason for me to pull myself out from my comfort zone and try out the recipe at last!


Hot out from the oven!

I divided the dough into 2 portions and added nibbed almonds to one and left out the other, as some like it crunchy & nutty and some don't!  As the name suggest, the cookies turned out very crunchy and crisp. I couldn't stop munching at just one. They taste somewhat like 'Hup Toh Soh'. Maybe I should rename them 'Almond Soh'!  


I'm submitting this post to Aspiring Bakers #3: My Favorite CNY Cookie (Jan 2011), details can be found here. If you're interested please feel free to join. Happy baking all! 
 

Almond Crunch Cookies
(recipe taken from 'Baking Code' by Alex Goh)

Ingredients
100 g butter
130 g sugar
1/8 tsp salt
1/4 tsp ammonia
1 egg
1/2 tsp vanilla essence
230 g plain flour
1/2 tsp baking soda
20 g ground almond
60 g nibbed almond

Note: I suggest toasting the nibbed almonds first prior to folding in, for better aroma.

Method:
1) Beat together butter, sugar, salt and ammonia till light and fluffy.
2) Add in eggs and vanilla essence, combine well.
3) Sift together plain flour, baking soda and ground almonds. Then mix with butter mixture.Fold in nibbed almond.
4) Pinch a small piece of dough about 10 g and shape into a ball. Place it onto a greased baking pan and flatten lightly. Do this again until you finish the whole batch of dough. Then, lightly brush the cookies with egg wash and decorate with whole shelled almonds on top.  
5) Bake at  170°C for 20 minutes or until lightly golden.

Thursday, January 6, 2011

'3 Cups Chicken' Inspired Dish


3 cups WHAT?  '3 Cups Chicken' is a direct English translation of  'Sanbeiji', a Chinese dish that is so called because it requires 3 key sauce ingredients in equal proportions and they are soy sauce, rice wine and sesame oil.

Read here in wikipaedia if u are interested to read more on the origin & background of  '3 Cups Chicken'.


This chicken  dish I made is an 'accidental' one. I had some ready marinaded chicken thigh pieces which had to be consumed soon, and just when I was contemplating on how to cook them for dinner, I saw a timely blog post on 3 Cups Chicken. So, 3 Cups it was! I don't know if this dish can be  considered or qualify as '3 Cups Chicken' but it's nevertheless an inspired one.  I've added some lovely yellow & red bell peppers and some leeks too. The outcome was rather good and received praises from my dear Hubby. He kept saying how fragrant this dish was and he loves the combination of the bell peppers and leeks.


3 Cups Inspired Chicken 

Ingredients:

about 600 g Chicken Thighs (cut to bite size pieces and marinate with 1 Tbs minced garlic, 1 Tbs ginger juice, 1 Tbs oyster sauce, 1 Tbs soy sauce, dash of salt & white pepper)
2 Leeks, chopped
2 Bell Peppers (1 red & 1 yellow, dice roughly)
1 Tbs Soy Sauce
1 Tbs Tshao Shing Cooking Wine
1/2 Tbs Sesame oil (Note: Ok I cheated a little. I was afraid the sesame oil might be too overpowering, so I didn't follow the 1:1:1 proportion)
Salt & Pepper to taste


Method:

1) In a pan or wok, stir fry chicken until golden. Set aside.
2) In the same pan, add the sesame oil, dump in the leeks and bell pepper. Stir fry until half cooked. Tumble in the chicken and drizzle in the soy sauce and cooking wine. Continue stir frying until fully cooked and sauce has reduced and slightly thickened. Season with salt & pepper. Done!

Sunday, January 2, 2011

I scream, U scream, We all scream for Green Tea Ice Cream!


This is my first time making green tea ice cream and it is the best ice cream I've ever made. It's so creamy, it beats those from Japanese Restaurants hands down! Yup, HANDS DOWN!

My Daughter agrees with me too. I didn't need to offer or serve the ice cream to her. She just helped herself  to the ice cream and finished the whole batch within a couple of days. Heck, I got to enjoy only a couple mouthfuls.

'YUMMERS!' was what my Daughter said everytime she had her fill of this.


Found the recipe here as  I was trawling the net looking for a good green tea ice cream recipe to finish off the green tea powder leftover from the Green Tea Tiramisu I made. Now, instead of needing to finish of my stash of green tea powder, I need to buy more to make more of this delicious ice cream!


Green Tea Ice Cream
(yields 6 small scoops)

Ingredients:

2 tablespoons green tea powder (matcha)
2/3 cup granulated sugar (Reduced to 1/3 Cup and I used caster sugar)
3 egg yolks
3/4 cup milk
3/4 cup heavy cream

Method:
1. In a small bow, mix the green tea powder with 2 tablespoons granulated sugar.

2. In a separate bowl, mix together the egg yolks and remaining sugar.

3. Pour the milk into a small pan and gently heat until it's just about to boil (You'll see some bubbles appearing on the edges. Do not let it boil). Remove the from the heat and mix a few spoonfuls of the warm milk with the green tea powder/sugar mixture in a small bowl. When you have a smooth paste, add it to the remaining milk in the pan, then gradually combine with the egg yolk/sugar mixture.

4. Return mixture to the stove and heat gently over low heat (taking care to not let the mixture boil), until the mixture coats the back of a spoon. Remove from the heat, strain through a fine sieve, and allow to cool completely.

5. Lightly whip the cream and then add it to the cold green tea custard.

6. Transfer the mixture to a large container and chill for an hour or two in the refrigerator.

7. Put the chilled mixture in the freezer and freeze until half frozen about 1 hour (you'll see the mixture is frozen around the edges but the middle is not). Remove from freezer and mix well with a spoon or fork (stir very vigorously) to break up the ice crystals, return the mixture to the freezer. Repeat this 3 more times as it freezes every 30 minutes (you'll find the ice cream gets stiffer) to ensure that the ice cream is smooth.

Note: If u have an ice cream maker, skip Step 7, churn the mixture according to your ice cream maker's instruction after chilling the mixture in Step 6.
Related Posts Plugin for WordPress, Blogger...