Pages

Tuesday, December 20, 2011

Vanilla Yoghurt Buttercake

This recipe is a keeper. You know it's a keeper when you've substituted an  ingredient and it still works.  Here I've substituted milk with yoghurt. This was out of necessity really as I've ran out of milk. It turned out beautifully, moist and tender.  The yoghurt also added a bit of a tang and gave it a lift. Really yummy!


My Daughter G couldn't stop eating this cake. Not to toot my own horns, I think this yoghurt version tastes even better than the original one. My dear Hubby on the other hand loves the orginal version. Well, to each his own!


Vanilla Yoghurt Buttercake
(Recipe adapted from Simple Indulgence)

Ingredients:
150g unsalted butter, cut into cubes at room temperature
100g castor sugar
3 egg yolks
1½ tsp vanilla extract
¼ tsp salt
125ml plain yoghurt
175g cake flour
1½ tsp baking powder
3 egg white
40g castor sugar


Notes:
Original recipe uses milk instead of plain yoghurt.

Preparation:
Grease and line a 7” round cake pan with parchment paper.
Pre-heat oven at 200°C.

Method:


  1. Sift the cake flour and baking powder together into a bowl.
  2. In a mixing bowl,  put in the butter and 100g of sugar. Using the paddle attachment, beat the butter and sugar until light and fluffy.
  3. Add in the egg yolks, one at a time  and beat until it is incorporated. Add in the vanilla extract.
  4. At low speed, add in one third of the flour mixture and one third of the plain yoghurt alternately until done. Stop once mixture is well blended.
  5. In a separate clean bowl, whisk the egg white and 40g castor sugar until stiff. It's ready when the bowl is overturned and the egg white stays put.
  6. Fold in the egg white into the yolk and flour mixture until well blended. The batter may look a little curdled.
  7. Pour out the batter into the cake pan lined with baking paper.
  8. Reduce temperature to180°C - 190°C  and bake for about 30-35 minutes or until a cake tester inserted into the centre of the cake comes out clean.
  9. Remove cake from oven and  place it to cool on a wire rack for about 10 minutes before unmoulding. After unmoulding, remove the baking paper and leave to cool completely.


    Sunday, November 27, 2011

    Pumpkin Cupcakes


    Here's another cupcake recipe adapted from the delightfully sweet Primrose Bakery's 'Cupcakes' cookbook. This time I chose Pumpkin Cupcakes. I just love to incorporate veggies in my bakes. It makes me feel less guilty and a little wee bit 'healthier'.

    These cupcakes were nicely moist and soft. I left them unfrosted as I didn't want to add in extra calories. I bet they would've been even better with a creamy velvety cream cheese frosting. Ah, if only my ever expanding thighs permit!


    So far  the Primrose Bakery 'Cupcakes' cookbook have yet to dissappoint. I've tried 2 recipes, the Malted Cupcakes (Milo Cupcakes) and this Pumpkin Cupcakes. Both turned out satisfactorily moist and tender. But they may be a tad too sweet and you may need to adjust the sugar to suit your tastebud. I've reduced  the sugar for the pumpkin recipe below.


    Pumpkin Cupcakes
    (Adapted from Primrose Bakery  'Cupcakes' cookbook) 

    (makes 12 regular cupcakes)

    Ingredients:
    • 110g butter  
    • 200g soft light brown sugar 
    • 2 large eggs 
    • 1/2 tsp vanilla extract 
    • 100g pureed pumpkin 
    • 125g self-raising flour
    • 120g plain flour
    • 1 tsp mixed spice
    • 125ml buttermilk (or 120ml water mixed with 2 tbs buttermilk powder)

    Method:
    1. Cream butter and brown sugar with an electric hand whisk until pale and smooth, which should take 3-5 minutes.  Add the eggs one at a time, add vanilla extract, beating well after each addition.  Then add pumpkin and beat until just combined.
    2. Combine and sift  self-raising flour, plain flour and mixed spice in a bowl.  Add 1/3 of the flours to the butter mixture and beat until just combined.  Add 1/2 the buttermilk and beat again, then repeat these steps until all the ingredients have been added.
    3. Spoon the mixture into 12  cupcake cases, filling them to about 2/3 full.  Bake at 180 C for about 25 mins until slightly raised and golden brown.  Once cooked, remove from the oven and leave the cupcakes in their tins for about 10 mins before cooling on a wire rack.


    I'm submitting this post to Aspiring Baker's #13: Enjoy Cupcakes! (November 2011) hosted by Min of Min's Blog.

      Monday, November 21, 2011

      Milo Cupcakes


      We, especially Malaysians & Singaporeans grew up drinking Milo. It is a staple breakfast drink in most households and is served  in all coffee shops. If you're reading and wondering what Milo is, it is actually a brand name of a chocolate malted drink. Heard of Ovaltine? But Ovaltine somehow is not as popular as Milo. 

      Instead of drinking that mug of Milo, how about eating one for a change ... a Milo cupcake? I made these Milo cupcakes the other day just for this month's  Aspiring Baker's cupcake theme. I used a recipe adapted from the Primrose Bakery Cupcakes cookbook and frosted them with Swiss Meringue Buttercream.  These Milo cupcakes were soft and moist and very Milo-y. Yummy!  One little issue though, the crumb stuck to my teeth everytime I took a bite! I'm wondering whether this is because I've added too much Milo? The original recipe ask for half the amount I used. Hmmm .... anybody knows why?      


      Milo Cupcakes
      Recipe adapted from Primrose Bakery Cupcakes cookbook

      Ingredients:
      110g butter, softened
      120g soft brown sugar 
      100g caster sugar
      2 large eggs
      125g self raising flour
      60g cake flour
      100g Milo powder
      125ml milk
      1/2 tsp vanilla extract
      1 tbs heavy cream


      Method:

      1. Preheat the oven to 160C and line a 12 hole muffin tin with paper cases. 
      2. In a large mixing bowl cream together the butter and the sugars until pale and smooth. 
      3. Add the eggs one at a time, mixing into the mixture between additions. 
      4. In a separate bowl, sift and combine together the flours and Milo powder.
      5. Mix the milk together with vanilla extract and heavy cream.
      6.  Add 1/3 of the flour to the creamed butter/sugar mixture.  Beat well until combined. Then, add 1/3 of the milk mixture and beat again.  Repeat this step until the last of the flour and then the last of the milk, beating well between additions. 
      7. Spoon the mixture into the paper cases.  Fill about 2/3 full. 
      8. Bake for about 25 mins until golden brown or until a skewer inserted comes out clean.
      9. Remove from the oven and leave to cool in the tin for 5-10 minutes. 
      10. Then turn out to cool completely on a wire rack. 

      Note:
      I bake the cupcakes in small size muffin tins and yielded 28 cupcakes which took 20 minutes to bake.


      Swiss Meringue Buttercream
      (Recipe adapted from Table for 2 or more)

      Ingredients:
      2 egg whites
      100gm sugar
      170gm unsalted butter, lightly softened

      Method:

      1. Put the sugar and egg whites in a large heatproof bowl over a saucepan of simmering water and whisk constantly until the sugar is completely dissolved and temperature has reached 65C. The mixture will look like marshmallow cream. Remove from stove.
      2. Pour meringue into a mixing bowl. Beat the meringue on medium speed until it cools and forms a thick shiny meringue, about 5 minutes.
      3. Now add in add the butter, one tablespoon at a time, beating until smooth. Mixture will be soupy and maybe curdled. Do not worry. It will come together nicely in the end. Carry on beating on medium-high speed until it is thick and very smooth, approximately  6-10 minutes. 


      I'm submitting this post to Aspiring Baker's #13: Enjoy Cupcakes! (November 2011) hosted by Min of Min's Blog.


      Saturday, November 12, 2011

      Fudgy Wudgy Okara Brownies

      If I don't tell, you probably wouldn't have known these fudgy wudgy brownies contain okara. Okara is a by product of soy beans, the pulpy mass leftover from straining soy bean milk. If you make soy bean milk at home, don't throw the okara away. Make these and you'll be glad you've saved it!

      Well, my Daughter obviously didn't suspect a thing. She enjoyed the brownies so much and even helped herself to seconds. If only she knew. But she did! I accidentally leaked out the 'secret ingredient' while talking to dear Hubby. This fazed her a little but she soon  forgotten about it and reached out for the leftovers. Really, these brownies don't taste beany at all and it's really quite hard to believe they contain okara! Hehehe! Who would have thought something so good and healthy can be so yummy (in the form of a brownie of course!).


      After much browsing and researching, I decided to use a vegan recipe from Vegan Feast Kitchen as it seems to be quite a popular one where okara brownies are concerned. Being a vegan recipe, it calls for egg replacement glop and for non-vegans like me this is really quite unheard of! So I used REAL eggs instead, and REAL butter in place of the Earth Balance which is actually margarine.   

      Here it is, the recipe, de-veganised (if there's such a word!).


      Okara
      FUDGY WUDGY OKARA BROWNIES
      Makes 14 cupcake squares 

      Ingredients:

      4 Eggs
      2 cups Brown sugar
      3/4 cup, packed well-squeezed Okara (soybean pulp from making soymilk)
      4 oz (1/2 cup) melted Butter
      1/4 cup Water
      2 teaspoons Vanilla extract
      1 1/4 cups unsweetened cocoa powder
      1/2 cup plain white flour
      1/4 teaspoon salt
      1/2 teaspoon baking powder 
      1 cup chopped nuts (walnuts, pecans, or other favorite nuts) 


      Method:
      1. Preheat the oven to 150C. Line a 12 hole square muffin pan with cupcake liners.
      2. In a mixing bowl, beat eggs together with brown sugar until thick and foamy. Add vanilla, water, melted butter and okara. Combine well.
      3. In another bowl, mix together the cocoa powder, flour, salt and baking powder. Sift  into the wet mixture. Fold and stir briefly, just to blend. Do this in batches. Fold in the nuts.
      4. Scrape the batter into the prepared muffin pan until almost full and bake for about 40 minutes or until skewer comes out clean.

      Notes:
      1. Baking time is just a guideline . Your oven may need less or more time. 
      2. If you prefer, use a 9 inch square baking pan and line with non-stick parchment paper (with over hang on the sides for easy removal). Bake for about 50 minutes. Leave to cool on a rack. Do not cut until the brownies are cool. You can lift the whole thing out of the pan, using the parchment liner, onto a cutting board.

      Wednesday, November 9, 2011

      Homemade Soya Bean Milk


      I've always thought making homemade soya bean milk is a difficult process and that you must own a soya bean milk maker machine to do the job. How wrong was I! If you have a food processor and a muslin/cheese cloth, you're good to go. It's really not difficult at all, just a little tedious and messy. That's what's  great about blogging. I learn new things all the time. Though making homemade soya bean milk is nothing new to most Asian homecooks to shout about, it is a big deal for a noob cook like me.  I can now proudly say I make my own soya bean milk from scratch! Haha!

      To make soya bean milk, first you need to soak the beans overnight. The beans will swell to double its size. Rinse and drain and then place in the food processor. Add water just enough to cover the beans and blend. Squeeze and strain out using a muslin/cheese cloth. Put the strained pulp back in the food processor, add water to cover and blend again. This is to extract as much milk from the beans as possible. Strain soya bean milk into a pot, slowly bring to the boil while stirring regularly. Skim off any foam. Let it gently simmer for 10 minutes. That's it! Homemade soya bean milk.  Thick and creamy and nothing like what you get from outside. You can add as much or as little sugar to your liking and even flavour the milk with pandan leaves. If you prefer a less thick soya milk, just thin it down with more water. Drink it warm or cold as you like. How great is that huh?

      One thing to note. While cooling the soya bean milk, it will form a layer of 'beancurd sheet' on top. Do not try to stir it in the milk like what I did. You'll end up with clumpy milk.  Just gently scrape it away. Discard the beancurd sheet or you can dry it and save for another use, but I've not tried that.  You also need to strain the soya bean milk  to get rid of any bits of beancurd sheet that might be left. For the smoothest texture, strain and strain again if you must. Store the soya bean milk in the refrigerator if you can't finish within the day its made. I've kept it for a couple of days and it was still okay.

      Go here for the recipe and  detailed step by step method. I used 250g soya beans and that yielded somewhere  between 1 1/2  to 2 litres of soya bean milk.

      Thursday, October 27, 2011

      1st Anniversary Giveaway Winner!

      Thank you to everyone who entered!

      Here's the list of participants, numbered according to the date of his/her comment.

      1) Janine
      2) Small Small Baker
      3) Hanushi
      4) Lena
      5) Yummy Bakes
      6) Swee San
      7) Anne
      8) bebecrebecca
      9) Alice Tai
      10) Jamie
      11) Mixue
      12) DG
      13) Janice
      14) Jess
      15) Kayleen
      16) Adeline
      17) Christine T
      18) lvweichin
      19) Edith

      And the winner is ......

      DRUMROLLLLL ........


      CONGRATULATIONS

      Alice Tai!


      You are now the proud owner of this Silicone Madeleine Pan! :)

      I'll be emailing you soon!

      Sunday, October 23, 2011

      Bingka Keladi (Baked Yam Kuih)


      Besides being steamed, kuehs also come in baked form. Like this Bingka Keladi I made the other day. It was very dense, a little sticky, a little chewy just like any steamed kueh except it had drier outer crust. It looked plain & boring and rather unattractive compared to other colourful kuehs, but really looks can be deceiving.  It was very fragrant and had a prominent coconut and yam taste. It almost felt like I was eating mashed yam in compacted form! This kueh was quite addictive too. Before I knew it, I had eaten almost half the cake!

      Bingka Keladi (Baked Yam Kuih)
      (Recipe adapted from here)

      Ingredients
      • 3 eggs
      • 3 cups coconut milk
      • 2 cups plain flour
      • 1 cup sugar
      • 1/2 tsp salt
      • 1 tsp vanilla essence
      • 2 Tbs butter
      • 2 cups yam (steamed or boiled, drained, then mashed)
      • 1 tsp purple colouring  (optional)
      • sesame seeds for sprinkling on top

      Method: 
      1. Preheat oven at 200C. Grease a 9 inch square pan  with butter and preheat in the oven for a while.
      2. Using a blender or food processor, blend all ingredients together till smooth and combined. Do this in batches if  you can't fit everything all at once. Batter will be quite thin & runny. 
      3. Add purple colouring and mix til coloring is well combined.
      4. Pour batter into preheated pan. Sprinkle sesame seeds evenly on top.
      5. Bake for about 1 hour, using both top and bottom heat. If you like crusty top, bake further for 10 minutes using top heat only.
      6. Onced baked, remove from oven and leave to cool completely before cutting.

      I'm submitting this post to Aspiring Bakers #12: Traditional Kueh (October 2011) hosted by SSB of Small Small Baker.
      Made any kuehs lately? Do join in the fun too.

        Saturday, October 22, 2011

        Pumpkin Huat Kueh

        HUATT ARR!!!
        (meaning PROSPER in Chinese)

         
        This was what I was greeted with when I lifted the lid from my steamer.....


        Puffy, Voluptuous, Wide Smiling Huat Kuehs.

        This made me grinning from ear to ear. The Huat Kuehs had 'prospered' .... this mean I'm going to have good fortune in the coming days.  Hehehe.

        This recipe from Cherry's Kitchen here is easy and quick to prepare. I made these in just an hour, including proofing the starter dough and steaming & mashing the pumpkin. If I may say so, this is a failproof recipe, because I had missed a step - which was to proof the Kuehs for 10 minutes before steaming. Still they rose and cracked beautifully.

         
        HUATT ARR!!!

          
        Pumpkin Huat Kueh
        (Recipe adapted from Cherry's Kitchen here )

        Ingredients:

        50g Plain flour
        Water 50g
        1 tsp Yeast
        200g Pumpkin (steamed, then mashed),
        100g Coconut milk
        50g Water
        140g Gula melaka (Palm Sugar)
        1 Egg
        320g Plain flour
        2 tsp Double acting baking powder

         
        Method:
        1. Mix together plain flour, water and yeast. Leave aside for ½ hr until the dough has proofed.
        2. In a blender, combine pumpkin, coconut milk, water, gula melaka and egg together.
        3. Pour pumpkin mixture into a large mixing bowl. Sift in plain flour and double acting baking powder. Then add in the proofed starter dough and mix evenly. You'll get thick wet gooey mixture. 
        4. Pour mixture over cups until almost to the top. Dip a knife in oil and make a deep “X” across the batter in each cup. Leave aside to proof for 10 minutes.
        5. Steam over high heat for 15 minutes. Do not peak/remove lid while steaming.

        Note:
        • I made half the recipe and got  6 Huat Kuehs using medium sized muffin cups.
        • You may use Hong Kong flour or cake flour for a softer finer textured Huat Kuehs.


        I'm submitting this post to Aspiring Bakers #12: Traditional Kueh (October 2011) hosted by SSB of Small Small Baker

          Tuesday, October 18, 2011

          Yam/Taro Ondeh Ondeh

          Ondeh Ondeh is one of my favourite kuehs. I love the oozy syrupy  palm sugar filling encased in the soft yet slightly chewy glutinous ball accompanied by the salty sweet taste of grated coconut. But what I love most is the experience of eating it. You see, eating Ondeh Ondeh is a messy affair.  You cannot be demure and take dainty bites. Unless if you don't mind sticky syrup sputtering all over  your clothes and whatever that is near you. 
          Forget about being lady like. To eat one, you have to open your mouth wide, pop the whole ball into your mouth and close your mouth tightly. Bite into it and savour the the sweet filling bursting out!  This is the best part and I must say, an absolute joy! I'm sure you all agree with me too. :)


          Here's my first ever batch of Ondeh Ondeh. Have always wanted to make my own but just never did as I've always thought it involves a lot of work. And it does! ... at least to me. What I find hard is filling the glutinous balls neatly. My hands and fingers are just not deft or nimble enough. It took me more than 1 hour just filling the balls alone. I'd suggest making these when you have someone to help you.  The more the merrier. Anyway, for all the hard work I've put in, I was well rewarded in the end when I pop one Ondeh into my mouth, then another and another .... and another. Yup, I had a gorge fest. Haha!  
            
          As for the recipe, I adapted from the cookbook 'Delicious Kueh & Desserts' by Patricia Lee. I have made a little substitution by using yam in place of the sweet potatoes called for and omitted the coloring.  The green tint you see came from the pandan juice. And if you're wondering, the yam taste was not prominent at all. I couldn't taste any yam flavour under all that fragrant pandan and coconut. I've also found the amount of palm sugar called for was not enough to fill the dough balls. To get that oozy filling that'll sputter when you bite, you have to be very generous with the filling!


          I'm submitting this post to Aspiring Bakers #12: Traditional Kueh (October 2011) hosted by SSB of Small Small Baker


          Yam/Taro Ondeh Ondeh
          (Recipe adapted from 'Delicious Nyonya Kueh & Desserts' cookbook by Patricia Lee)

          Ingredients:

          300 g Glutinous rice flour
          2 tbs Tapioca flour
          200 g  Mashed Yam/Taro
          10 Pandan Leaves
          200 ml Water
          a pinch of salt
          100 g Palm sugar (grated and mixed with 1 tbsp castor sugar)
          250 g grated white coconut
          a pinch of salt
          additional water, if dough is dry
          Method: 
          1. Mix grated white coconut with a pinch of salt, then steam on 2 pieces of pandan leaves for 10 minutes. Leave to cool.
          2. Cut the remaining 8 pandan leaves into smaller pieces, put into a blender together with the water. Blend, then strain. Add salt. Mix well. 
          3. In a large bowl mix together glutinous rice flour and tapioca flour.  Add in mashed yam. Pour in pandan juice and knead till dough is smooth and pliable like playdoh. If dough is too dry, slowly add more water into it, a tablespoon at a time.
          4. Pinch a small lump of dough, roll into a ball and flatten slightly. Put a little palm sugar at the centre. Seal well and roll into smooth ball again.  
          5. Bring a pot of water to the boil. Gently drop the filled dough balls into it. When the balls  float to the surface, keep boiling for another 2 minutes. Scoop up with a strainer and coat in  grated coconut. Serve.

          Note:
          1. Original recipe calls for sweet potatoes and a few drops green food colouring. As I used yam and my dough was very dry, I had added more water, a tablespoon at a time until I got smooth pliable dough.
          2. The Ondeh Ondeh is best eaten on the day it is made. If  you have leftovers, store them in the fridge. Refrigeration though makes the Ondeh Ondeh tough. Reheat in the steamer for a few minutes before eating. They'll be nice & soft again. 


          Friday, October 14, 2011

          Mad about Madeleines! ...and Giveaway Update


          My friends, madeleines are what you'll be madly baking if u happen to be the lucky recipient of my blog's 1st anniversary giveaway!


          Yup, I'm giving away a silicone madeleine pan! :). 


          Thanks for all the comments I've received thus far. I'm a little embarassed and also sad to say I'm ditching my original plan of awarding the gift to the person who dropped in the 50th comment. Honestly, I just can't wait anymore. I want to send out this silicone madeleine pan to the lucky recipient ASAP :).  I've given this giveaway a rethought and now I think using an online random number generator is the best solution to pick the winner for the giveaway. For those who have left comments in my previous post here, don't worry, you are still eligible to win the gift :)

          Anyone who is interested to participate in this giveaway, please leave your comments in this post or my previous post  here  by the 23rd October 2011. Please include your email address in your comments so that I can contact you should you be the lucky winner. I will announce the winner within a week after the deadline.

          Good luck! :)

          Tuesday, October 4, 2011

          1st Anniversary .... and a Giveaway!

          OMG! Happy 1st Birthday to my blog Sotong Cooks! How time flies and I very nearly forgot about it until I saw a post on a fellow blogger's blog anniversary. I just made it in time! It has been exactly one year since I posted my very first entry. I still remember the feeling of excitement and hesitation when I first pressed the submit button - which was a post on Nigella's Brownies.

          Over the past one year, I've dicovered many incredible talented bloggers, kept my hands full with new recipes  and also learnt some nifty culinary tips & tricks. Not only that, blogging has also spark an interest in food styling & photography. Stuffs like aperture or 'bokeh' would've been so alien to me a year ago. Now when I go shopping, I'm more interested in tablewares and kitchenwares and whatever props that I could use for food styling. Gone are the days of shoes, clothes and bags! LOL 

          On this day, I wish to thank all my fellow blogger friends as well as readers who has been following and encouraging me. Thank you for all your support, kind words and compliments. I appreciate it very much! Your words of advise, comments and feedbacks whether positive or negative are always welcome as they help me to learn and improve my knowledge. Sharing is caring :)

          As a token of appreciation I would like to give away a small gift. Here how it goes. The person who drop in the 50th comment in this post will 'win' the gift. In your comment, you must include your email and a link to your blog (if u have) and complete this sentence "I like Sotong Cooks because ____________" .  You can leave as many comments as you like. Everyone is welcome to join. The giveaway ends when I receive the 50th comment! :) I will reveal the gift in time to come.  Keep your comments coming! :)


          UPDATE (14th October 2011): I've now decided to use online random number generator to pick the lucky winner. Anyone who is interested to participate in this giveaway, please leave your comments and email by the 23rd October 2011.

          Sunday, October 2, 2011

          Carrot Cupcakes


          Sometimes I can be a little mad, obsessed even. You see, I've been on a quest to find the perfect carrot cake recipe for the longest time and this particular carrot cake recipe, I've made it not once, not twice but three times!

          The first time, I made it into cupcakes, I was quite happy with the result but thought they were a little too oily  and the spice were a little much. The second time round, I reduced the oil and adjusted the spice flavouring, the texture came out a little dry. Not wanting to give up, I gave it a go again. This time keeping the original amount of oil and adjusting the spice only, and instead of cupcakes I made a 2 layer 8 inch round cake. Though the flavour was good, it was a little dry. *Sigh* 

          Alas this recipe was not meant to be all I'd hope for. Maybe I'm just too fussy. A perfectionist, maybe. Will I ever find that darn perfect carrot cake recipe? All I'm looking for is a carrot cake loaded with carrots which is not too spicy, not too sweet, not too oily, does not reek of bicarb, not too dense and most importantly moist but not overly wet. Am I asking too much? LOL.

          Even though this carrot cake may not be the holy grail of carrot cakes in my book, but you know what I'd still give this recipe a go, but in cupcake form only. It seems to have the best texture this way. 


          P/S - The cream cheese frosting from Martha Stewart was perfect. Creamy and just the right level of sweetness.


          Carrot Cake
          (adapted from Cake Mistress here)

          Ingredient
          1 cup Brown Sugar (about 150g)
          1 cup Vegetable Oil
          3 Large Eggs
          Pinch Salt
          1/2 teaspoon Bicarb of Soda
          2 cups Self Raising Flour (240g)
          2 cups finely grated Carrot (200g)
          1/2 cup Walnuts, finely chopped (about 50g)
          3/4 teaspoon Cinnamon
          3/4 teaspoon Nutmeg
          1 teaspoon vanilla extract


          Cream Cheese Frosting
          (adapted from Martha Stewart here)

          Ingredient
          250g cream cheese, room temperature
          115g unsalted butter, cut into pieces, room temperature
          125g confectioners' sugar
          1 teaspoon pure vanilla extract
          zest of 1 orange, finely grated

          Method

          To make cake:

          1) Heat oven to 180 degrees Celsius.
          2) Beat sugar and oil until thick, then add 1 egg at a time and keep beating for a few more minutes.
          3) Add salt, bicarb soda, carrots, flour, walnuts and spices. Mix with wooden spoon until all combined.
          4) Pour batter evenly between cupcake pan. Bake for 15-20 minutes, or until light golden and cake springs back when touched in the middle. Baking time might vary depending on your personal oven.

          To make frosting: 
          Place butter and cream cheese in a mixing bowl. Beat until smooth and well blended. Sift in confectioners' sugar, and gradually beat until smooth. Add vanilla and orange zest, stir to combine.

          Friday, September 23, 2011

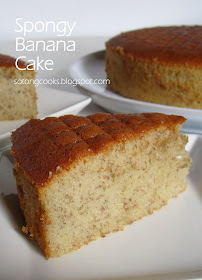
          Spongy Banana Cake

          I have been captivated by this Spongy Banana Cake (from Wen's Delight here ) the first time I saw it.  It seems this cake is  very popular among asian bloggers and has received many prasies. So, does it live up to it's name?

          Here it is, fresh out from my oven.


          Spongy, yes!

          It turned out beautifully. As it cooled, it didn't shrink or sink in the middle as I thought it would - as what happened to most of my sponge cakes. Really beyond my expectation. Spongy, moist and airy. Good to eat with a cup of tea.


          Spongy Banana Cake
          (Recipe adapted from Wen's Delight here )

          Ingredients:
          150g  Eggs (Room temp - About 4 large eggs)
          130g Sugar
          200g Banana (mashed)
          150g  Cake flour
          1/2 tsp Baking powder
          1/4 tsp Baking soda
          100g  Vegetable oil
          1/4 tsp Rum
          1/2 tsp vanilla

          Method:

          1) Preheat oven to 160 degree C.
          2) Grease & line a 8" round tin with baking paper.
          3) Sieve flour, baking powder & baking soda together. Sieve twice & set aside.
          4) Whisk eggs, sugar & banana at max speed till stiff/ribbon stage.
          5) Gently fold in flour gradually.
          6) Take 1/3 of the batter, mix with the veg oil. Then, pour back into the remaining batter and combine well till batter is shiny & flowing.
          7) Bake for 40 - 45mins.
          8) Remove from oven. Leave to cool for 5 minutes then turn out, remove baking paper and cool completely on wire rack.


          Saturday, September 10, 2011

          Pavlova


          This is my first ever pavlova. It turned out beautifully... except for the cracks. I didn't know the shell would be so delicate. It cracked easily when I tried to remove the baking paper. In the end, I got scared and  gave up, and left the baking paper paper still intact. I just trimmed off the excess baking paper around edges.  Anyway, this made a showstopping dessert on a recent family gathering. Dressed up with billowy whipped cream and piled high with strawberries, kiwis and white peaches, the otherwise unassuming  plain pavlova shell looked mighty grand. The shell was crisp and the inside soft, light and marsmallowy. I only wish it hadn't been so sweet. Thankfully generously toppings of whipped cream and fresh fruits counteracted the sweetness somewhat. I imagine a tart passion fruit sauce drizzled all over would be fantastic. Or maybe a zippy lime curd, it would go so well with the oh-so-sweet pavlova.

          For anyone who's looking to make a pavlova, this is a good recipe to try. Very simple. I guess I also  owe it to this helpful tip that my pavlova didn't end up a weeping mess - which is to  make sure the sugar is dissolved completely when beating the egg whites. Now I just wonder, how do you remove the pavlova from the baking paper without cracking it. Tips, anyone?


          The beaten meringue all thick & glossy and ready to be bake.
          Pavlova
          (Recipe adapted from Best Recipes here )


          Ingredients:
          4 egg whites
          1 cup (250ml) sugar
          1 tsp lemon juice or vinegar ( I used apple cider vinegar)
          2 tsp cornflour


          Method:

          1) Whisk egg whites until frothy. Add all the rest of the ingredients and continue whisking until very glossy and thick and stiff. Make sure all the sugar has dissolved - feel by rubbing between fingers. It should feel smooth and not grainy.
          2) On a baking paper lined tray, pile on the meringue, shape the meringue into a large centre with a slight hollow in the centre.
          3) Bake in a preheated oven at 130 C for 1 1/2 hours or until crisp on the outside. Turn off oven and leave the pavlova to cool in the oven with the door slightly ajar.
          4) Generously pile on whipped cream and fresh fruits just before serving. Done!


          Tuesday, August 30, 2011

          7 Links Challenge

          I was tagged and  invited by Lena of Frozen Wings to play a game called the 7 Links Challenge.  The challenge is to publish a list of 7 links to previous posts that I have written that respond to the following 7 categories:
          1) The most beautiful post
          2) The most popular post
          3) The most controversial post
          4) The most helpful post
          5) A post that was surprisingly successful
          6) A post that did not get the attention it deserves
          7) A post I am most proud of

          Thank you Lena for the invitation. It was fun looking back at my old posts and see how far I've progressed thus far from my baking/cooking to my photo taking skills - man, I want a dslr camera! 

          Now, I'd like to extend this challenge to all bloggers who are interested to play this game. Are you up for it?

          Here are my 7 links.  

          1) The most beautiful post - Swiss Carrot Cake
          The pink color scheme, the little sugar flowers, the simply iced cake. I just love the sight. So pretty.


          2) The most popular postThe almost perfect sponge cake
          Based on pageviews, this post has received the most views to date.


          3) The most controversial post - NIL
          None so far. Anyone wanna debate with me? LOL


          4) The most helpful post - Cocodrillo Ciabatta
          The embedded video was very helpful to me when I made the ciabatta. From the video, I got to see how the consistency of the very wet bread dough should look like and learned how to handle the dough. Hence, I think it would be useful to others who is interested to try the recipe. 


          5) A post that was surprisingly successful - Swiss Roll with Stawberry Jam
          Now, this is successful because when I posted this entry I didn't expect this plain swiss roll would garner any attention at all let alone praises. It was a surprise indeed. A very pleasant one :).


          6) A post that did not get the attention it deserves - Nigella's Molten Chocolate Baybycakes
          This didn't get as many attention as I thought it would.  Just look at that silky dark molten chocolate!   I expected oohs and aahhs, lip smacking sounds and drools dribbling.


          7) A post I am most proud of - Mango Mousse Cake
          This is the first mousse cake I've ever made and it has made me a convert. In the past, I was not a fan of  mousse cakes. I thought they had a weird texture, tasted waxy and just plain awful. I didn't realize then those mousse cakes from bakeries used non-dairy cream until I made this cake (I used full fat dairy whipping cream). It was so delicious. What a revelation!  Since then I've experimented and made many mousse cakes (which I've yet to post in my blog).

          Monday, August 29, 2011

          Food Processor Almond Danish Braid


          Man, I gotta give my self a pat in the back. I never would have thought I'd make danish pastry EVER! Okay, I cheated a little. I used Nigella Lawson's food processor recipe. See even the goddess herself cheats! Haha. This is what I love so much about Nigella. She makes everything simple and approachable to mere home cooks like me. Do try this recipe if  the task of laminating butter between layers of dough scares and intimidates u as it always did to me... and still does. I'll never attempt the proper old-school way of making danish pastry - why would I when it is so easy this way!

          I am submitting this post to Aspiring Bakers #10: Easy as Pie (August 2011), hosted by Janine of Not the Kitchen Sink! If you would like to join, please see details here.

          Food Processor Almond Danish Braid
          (Recipe adapted from  Nigella Lawson's 'How to be a Domestic Goddess' cookbook)

          Ingredients:
           
           
          For the pastry dough:
          60ml warm water
          125ml milk, at room temperature
          1 large egg, at room temperature
          350g white bread flour
          7g (1 package) rapid-rise yeast or 1 tbsp fresh yeast
          1 tsp salt
          25g caster sugar
          250g unsalted butter, cold, cut into thin slices

          For the filling:
          150g ground almond 
          80g icing sugar
          2 tbsp unsalted butter, room temperature
          ½ tsp almond extract (I used vanilla)
          1 large egg white, beaten lightly

          For the egg glaze:
          1 large egg, beaten with
          2 tbsp milk

          For the clear glaze:
          100g caster sugar
          60ml water

          For the sugar glaze:
          100g icing sugar
          1-2 tbsp warm water


          Method:

          To make pastry dough:
          Pour the water and milk into a measuring cup and add the egg, beating with a fork to mix. Put to one side for a moment. Put the flour, yeast, salt and sugar in the processor, and give one quick whizz just to mix. Add the cold slices of butter and process briefly so that the butter is cut up a little, though you still want visible chunks. Empty the contents of the food processor into a large mixing  bowl and quickly add the contents of the cup. Use your hands or a rubber spatula to fold the ingredients together, but don’t overdo it. Cover the bowl with plastic wrap, put in the refrigerator, and leave overnight or up to 4 days.

          To turn it into pastry, take it out of the refrigerator, let it get to room temperature, and roll it out to a 20-inch (50 cm) square. Fold the dough square into thirds, like a business letter, turning it afterward so that the closed fold is on your left, like the spine of a book. Roll out again to a 20-inch square, repeating the steps above three more times. Cut in half, wrap both pieces in plastic wrap and put in the refrigerator for 30 minutes. Or you can refrigerate one (up to 4 days) to use now (for the Almond Danish Braid) and put the other one in the freezer to use later.

          To make the almond filling:
          Beat the butter until soft. Mix in the ground almonds and powdered sugar. Then add the almond extract and 2 tbsp of the egg white. You can make this in advance and keep it in the fridge for up to a week.

          To make danish braid:
          (You'll need only 1/2 quantity of the pastry dough above)
          Roll the pastry out to a big rectangle. Slice the left and right thirds of the dough at an angle and parallel to the other side into 1/2 inch wide slices.Spread the filling on the middle of the dough.
          Fold the top and bottom flaps over to hold in the filling. Fold the slices of dough from the left and right sides of the middle, alternating and forming a braid.


          Place on the baking sheet and brush with the egg glaze. Leave to rise until it doubles in size and feels spongy like marshmallow, about 1 ½ hours. Meanwhile, preheat the oven to 175°C. Once risen, bake for 30 minutes or until golden.

          Remove to a wire rack and make the two remaining glazes.

          To make the clear glaze:
          Heat the granulated sugar and water in a small saucepan. Bring to the boil then take off the heat.

          To make the sugar glaze:
          Add the water to the confectioners’ sugar a little at a time to make a runny icing. Brush the braid with the clear glaze first once it has cooled a bit; then when almost cold zigzag the sugar glaze over it.

          Yummy moist almond filling which is not too sweet.

          Friday, August 26, 2011

          Rustic Free Form Pear Tart


          If you're like me who thinks all things pastry in general are a pain to make, this free form rustic tart may just change your mind!  This is one easy and delicious tart to make at home. I especially like the fact that I don't need to line a tart tin let alone needing one, but just roll the pastry into a rough circle and fold up the edges. And it's okay if it's uneven and knobbly, because rustic and homey is what we want.  I've got to say, I'm pretty pleased with this pear tart. It didn't get soggy like what I expected -  the filling was oozing pear juices and was bubbling away during baking. Instead,  the crust was deliciously buttery and crisp. The pears all soft and fragrant and  the juices thicken up nicely upon cooling. A delight to eat and eat..... and eat.

          I am submitting this to Aspiring Bakers #10: Easy as Pie (August 2011), hosted by Janine of Not the Kitchen Sink! If you would like to join, please see details here.

          Rustic Pear Tart
          Recipe adapted from here for the pastry and here for the filling.

          Ingredients

          Shortcrust Pastry:
          250g plain flour
          125g salted butter, chilled, finely chopped
          80g icing sugar
          2 egg yolks, chilled
          1 tbs water, chilled


          Filling:
          3 medium pears

          Method

          For the pastry:


          Monday, August 22, 2011

          Basic Chiffon Cake

          Great for making layered cakes.

          To my dear cousin Feli,

          Here's the basic chiffon cake recipe you asked for.

          This cake is soft, moist, fine textured and fluffier than other chiffon recipes I've tried. It freezes well too. The trick is to whip the egg whites until glossy and almost stiff. It's ready when the bowl is overturned the whites will not fall off. Bake at the lower rack of your oven and if you find your cake cracking, try baking at a lower temperature.

          Have fun trying!

          P/S Now, where's that scrummy cornflakes cookie recipe you promised? LOL 


          Ingredients:
          • 4 egg yolks
          • 80 ml water
          • 70g caster sugar
          • 1/2 tsp salt (reduce to 1/4 tsp if u like)
          • 120g self raising flour
          • 1/2 tsp vanilla essence
          • 1/2 cup (125 ml) corn oil
          • 4 egg whites
          • 1/2 tsp cream of tartar
          • 70g caster sugar


          Method:

          • Preheat oven at 160C.
          • Beat egg yolks, sugar and salt until sugar dissolves completely. Then, add water, vanilla, oil and self raising flour. Mix well.
          • In a clean mixing bowl, whisk egg whites until frothy. Add in the cream of tartar and 1/3 of the 70g caster sugar. Whisk until sugar dissolves before gradually adding in the rest of the sugar. Continue whisking until egg whites form stiff peaks and shiny and would not fall off the bowl when overturned.
          • Take a 1/4 of the beaten egg whites and fold in to the egg yolk mixture to lighten the batter. Gently fold in the rest of  the egg whites until well combined (until you see no streaks).
          • Pour batter into an 8 inch round deep cake tin with removable base or springform tin (no need to grease or line). 
          • Bake at lower rack of the oven for 40-50 minutes or until skewer comes out clean when plunged in the middle of the cake.
          • Cool inverted on a wire rack. Remove cake from tin when cake is cooled completely.

          Wednesday, August 17, 2011

          Pumpkin Muah Chee

          I had some leftover pumpkin puree and was wondering what to do with it and toyed with the idea of making pumpkin Muah Chee. 

          Here it is, my experimental Pumpkin Muah Chee which only took a mere couple of minutes to cook by zapping in the microwave.


          As you can see, the pumpkin made the muah chee a bright sunny yellow. However, it was not as pumpkin-ny tasting as you may think.  The taste was very subtle. In fact, I can hardly taste it. But it was fun experimenting. 

          Now I'm thinking of what other muah chee flavor I'll experiment next. I have so many ideas, from sweet potato to green tea to black sesame, I'm having a hard time to choose!


          Pumpkin Muah Chee
          (serves 2)

          Ingredients:
          100g pumpkin puree
          40g glutinous rice flour
          20g water
          1 tsp vegetable oil

          For coating:
          crushed / finely chopped peanuts
          brown sugar

          Method:
          Mix all ingredients into a smooth paste. Put into a microwave safe bowl, microwave on high for 2 minutes. Take out, give it a stir and microwave further for another 2 minutes. The dough would have become opaque, sticky and thicken.
          In the mean time, crush or finely chop some ready roasted peanuts. Mix with brown sugar to taste.
          Put the microwaved dough onto the peanut sugar mixture. Cut the dough to pieces using a plastic knife, at the same time coating the cut pieces with the peanut sugar mixture. Serve!

          Friday, August 12, 2011

          Mazarin Tarts

          Mazarin tarts are small Swedish almond tarts, oval shaped with a tender buttery crust and an even more buttery and moist cake-like almond filling, topped with sweet icing sugar glaze. Very fattening & rich but I absolutely love these delectable tarts and eating just one is never enough for me - I don't care even if they add extra inches to my thighs!  Unless I fly to Sweden, the only place I could get them is from Ikea Stores in Singapore and KL, both of which are sadly thousands of  miles away across the South China Sea from my place. Fortunately, I have a kind aunt who brings these tarts over whenever she comes to visit, but unfortunately, she does not visit often enough.  Thus, savouring these tarts is just a once-a-year indulgence for me. Not enough I say.   


          I have bookmarked this Mazarin recipe for the longest time and had told myself to make many times over, but I just never did. Honestly, to me pastry in general is such tedious work - a real challenge to my lazy bones, not to mention the most unconducive hot weather we're experiencing these days! However much I dread pastry making,  I do not want to miss out this month's  Aspiring Bakers   (everyone is challenged to make pies and tarts and all things pastry), and for my entry I'd like to finally give this Mazarin recipe a try.  And boy did all that 'hard' work paid off!  My homemade tarts were deliciously buttery and utterly moist with a bright hint of refreshing orange zest. Totally yum! What's more, my opinionated Mom raved about them and said they were better than those from Ikea! 
          *Smug smile*     

          I am submitting this to Aspiring Bakers #10: Easy as Pie (August 2011), hosted by Janine of Not the Kitchen Sink! If you would like to join, see details here.

           
          Mazarin Tarts
          (Recipe adapted from here)
          Wish I have oval shaped tins!
          Makes about 15 tarts
           
          Crust: 
          150g flour
          80g sugar
          110 g butter

          1 egg yolk
          1 tsp rum

          Filling:  
          100g butter 
          100g sugar 
          2 eggs 
          150g ground almonds
          finely grated zest of 1 orange 

          Glaze:
          150g icing sugar
          about 3 Tbs water 


          Method:

          Make tart crust: 
          Using a food processor, blitz the flour, sugar and butter together until crumbly. Add the lightly beaten egg yolk and rum and blitz again, just until dough forms. Tip the dough out, gather into a ball then flatten into a disk. Wrap the dough/disk in cling wrap and place in refrigerator to rest & firm up for at least half an hour. Pinch a small ball of dough and press evenly into each tart tins.

          Make Filling:
          Beat the butter and sugar until pale and fluffy, then add the eggs one at a time, beating thoroughly. Mix in grated orange zest and then gently fold in the ground almonds. Fill the tart shells with the  almond batter, smooth surface and then bake in the oven at 175 °C for about 20 minutes or till the tops turn a crisp golden brown and skewer comes out clean when tested. Wait till the tarts cool before glazing - the filling is likely to sink slightly during cooling.  

          Make Glaze:
          For the glaze, mix 3 tablespoons water with  the icing sugar to a spreadable consistency.  With the back of a spoon thinly cover the the tops of the cooled tarts with glaze. Let the glaze set and harden.

          Monday, August 8, 2011

          Butter Milk Pau


          Growing up my favorite filled paus were those with butter milk filling. Now they have  become my Daughter G's favorite too. She would eat the pau skin first and leave out the filling to slowly savour. 'Saving the best for last', she reasoned.  The butter milk filling is made of butter and copious amount of milk powder - very rich and milky. I've search high and low for the filling recipe and have tried a couple but they were not of the consistency I was looking for. This one comes close in taste but still too wet . What I'm looking for is dry-ish and a little crumbly. Oh well, the search continues.


          Butter Milk Pau
          Ingredients:

          Butter Milk Filling
          (recipe adapted from I cook I bake I love here)

          60g Castor Sugar
          60g Butter
          100g Milk Powder
          20g Corn Flour
          40g Fresh Milk

          Pau Skin
          (recipe adapted from Cooking Crave here)

          130 g warm water
          5 g instant yeast
          300g pau flour
          80g icing sugar
          30g oil
          2"x2" pachment papers for lining the paus


          Method:

          To make butter milk filling:

          Beat all the ingredients of the filling together until smooth. Leave the mixture in the fridge overnight to let it firm up so that it is easier to fill the pau skin with.


          To make & fill pau skin:

          In a big bowl slowly mix the yeast together with warm water and a tablespoon of icing sugar (from the 80g icing sugar). Cover, set aside and let it prove for 45mins - mixture will bubble up and expand.

          Sieve flour and icing sugar together into a big mixing bowl. Combine with the proofed yeast mixture. Add in oil. Start kneading the dough with hand. The dough will be a bit sticky at first, knead until it's soft and smooth. It takes approximately 20-25mins. Cover the bowl with wet cloth or cling wrap and let the dough rest for 15mins.

          After 15mins, the dough are ready to be wrapped with its fillings. Cut and weigh the dough into 30g balls.
          Take a piece of dough ball, flatten out, make sure the edges are thinner than the centre part. Spoon the fillings on the centre of the skin, fold, pleat and pinch to seal. Put the filled pau on a piece of parchment paper and cover with a damp cloth to prevent it from drying up. Once all the paus are filled, let them rest for about 30-45mins. Do not let them proof longer than the specified time to avoid wrinkly skin. Steam paus on high heat for 10-12 minutes.